Repairing a copper bay window roof in Gates Mills, Ohio.


Our recent repair of a copper standing seam roof in Gates Mills, Ohio.
The copper roof covering the front bay window had been leaking for an extended period, and there had been multiple failed attempts to fix the leaks. We were called in when these attempts were unsuccessful. It became evident that the roof had likely leaked since its original installation.
The standing seam panels, vertical ribs, and panel connections were all carelessly installed, and the prior caulking repairs were inadequate. We were asked to repair the immediate leaking area on the left side of the roof, while leaving the rest untouched to save time and money.


Incorrect installation of roof panels and flashing.
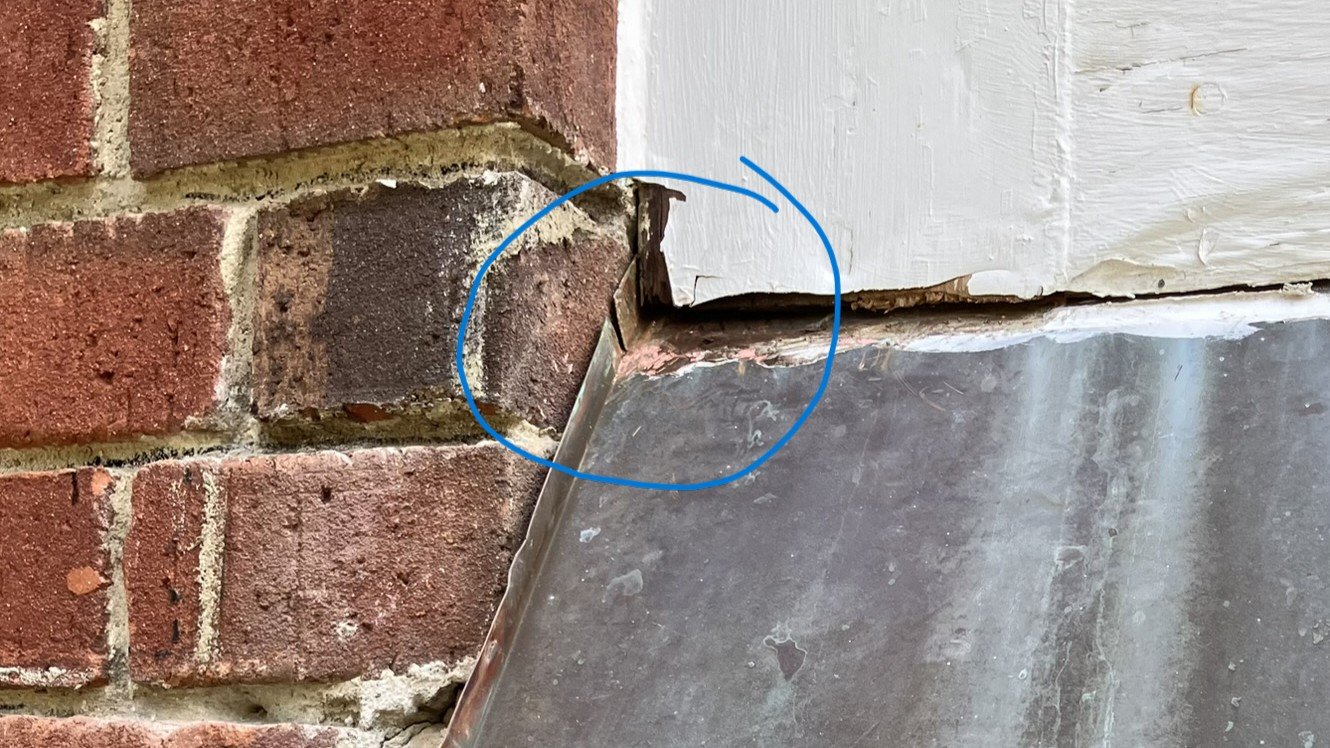
We started by removing two layers of caulking and the wall flashing. The wall flashing had been installed in two pieces of copper, cut to fit the brick courses. The copper was bent over the top of the bricks and secured with steel nails that had begun to rust. Additionally, a cheap acrylic caulk was improperly used as a sealant at the flashing and brick joint.
This method of installing wall flashing will quickly lead to buckling from the sun's heat, causing it to loosen from the caulking. We identified the primary leak at the top of the wall flashing, where it bent around the brick to meet the window. This piece was not cut correctly and was installed below the brick mortar joint.
Beneath this poorly installed flashing lay the main roof panel, which had been cut at the upstand to fit under the window trim—another source of leakage. Around the corner, the wall roof panel was similarly cut and bent against the wall and the lower rib piece. The cuts only had a small dab of caulking applied at the lower corner, which did little to prevent leaking.


Typical standing seam roof leak area
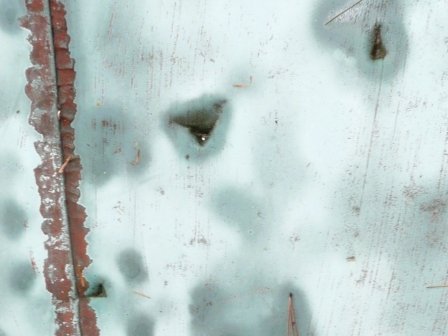
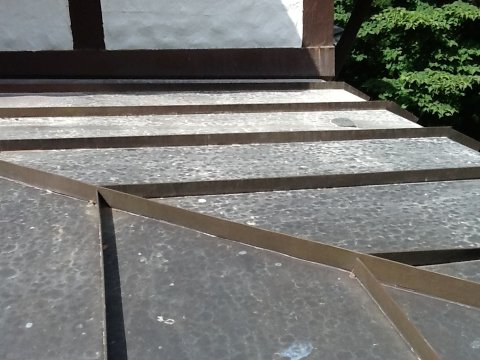
The standing seam panels were installed by bending the edges up three-quarters of an inch, then holding them in place with copper clips. At the intersection with the hip roof, the panel upstands were merely cut and butted together, leaving a large gap—as shown in the picture—where water could easily enter the roof.
The upstand bends were covered with a simple V-bend copper strip, which was secured using an inappropriate punching tool that cut through both the V-cover and the panel upstands.

New copper standing seam panel installed.
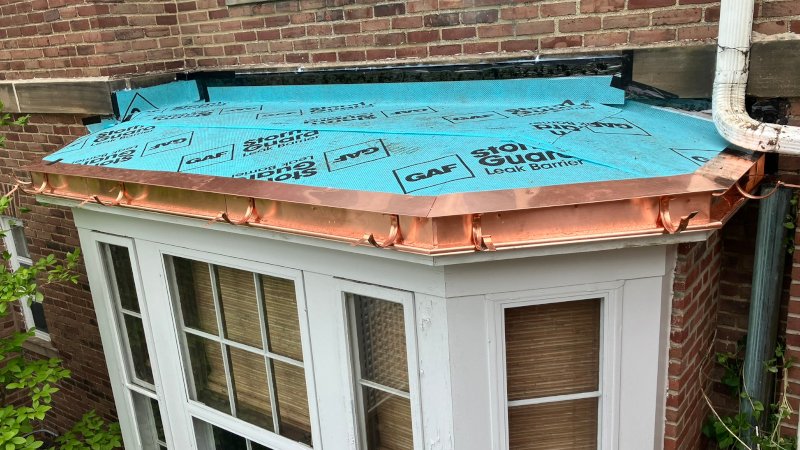
We removed all the existing wall flashing and roof panel, then installed new high-temperature underlayment. New gutter board flashing and custom drip edging, extending behind the gutter, were also installed to prevent ice backup into the roof eave. Given the design of this area—the roof being so close to the second-story wall with a gutter and downspout between them—this location is particularly vulnerable to snow buildup and ice damming.

New roof panel and flashing.
A new roof panel was fabricated, along with additional flashing to close the old standing seam hip ridge. These pieces were fitted to cover and protect the existing seams and secured with copper cleats. A groove was cut into the mortar joints of the wall to receive the wall flashing. Individual counter flashing pieces were cut and fitted to the wall, secured with lead and copper nails. A compatible mortar was then mixed, pressed firmly into the joints, and tooled to match the existing masonry.


At DM Crookshanks Copper Roofing, we specialize in repairing and installing copper roofing in Greater Cleveland and Northeast Ohio.
This is a step-by-step account with an accompanying video of the recent replacement of a leaking bay window copper roof on an old Shaker Heights, Ohio, house. This copper roof is original to the house, built in the early 1930s. And it's been leaking for a long time.
The roof is leaking at the left corner inset and right corner below the white rain downspout. There are also leaks along the eave behind the gutter.

The roof of the bay window attaches to the brick wall just below the sandstone wall band. That is the primary design flaw. The stone is too close to the roof to provide spacing for proper roof and counter flashing.
This entire roof was installed as a standing seam roof, which began leaking shortly after installation. The top section is too flat for standing seams and should have been installed with copper flat panel locked and soldered roof seams. The lower section of pitched, steeper roof is okay and will perform and look better with standing seams.
We start by removing the roofing and tar along the sandstone wall band. There is almost an inch and a half of tar, plus numerous caulking applications.


The original roofing mechanics tried to install copper flashing up and under the stone and brick wall, but they could not because the brick had been installed before the roof framing and decking. All they had to work with was an approximate half-inch gap between the wood roof deck and sandstone to install flashing. They then simply slipped the copper sheet roofing under the brick and stone and filled the gap with caulking.


After removing the old copper, we noticed additional signs of leaking at each of the standing seam ridge joints. Water leaked through the broken solder joints and flowed down the roof over the tar paper, fortunately keeping that area leak-free, but then it leaked into the eaves where the tar paper stopped from behind the gutter board. More leaking is observed at the far right corner under the upper roof gutter downspout, along with leaks behind the roof flashing.


We have removed all the old copper, cleaned the roof decking, and secured all loose roof boards and decorative wood trim. A new roofing underlayment has been installed to protect the roof deck and the home's interior from rain while the new roof is being installed. The trim previously supporting the old box gutter has a nicely crafted, rounded edge and is in great shape; it will be reused. Most trim moldings like this are only occasionally, if at all, properly protected from the elements. Most roofers lack the equipment or expertise to properly address this area, which often results in water damage from overflowing rain gutters. We will cover this with a custom-rolled length of copper flashing, with watertight soldered joints.

Once the copper sill cover is installed, we will affix copper drip edging, which will be formed to match the existing pitch of the roof. Gutter hangers/brackets are installed and secured with stainless steel screws at the rafters. Both the sill cover flashing and drip edge are secured using copper nails.
A layer of rosin paper is placed as a slip sheet between the underlayment and the copper to prevent the hot copper from melting and sticking to, the underlayment. Custom-fabricated copper standing seam roofing panels are crafted to fit the roof and secured with stainless steel cleats to allow for movement and accommodate expansion and contraction of the panels. The ends of the standing seam ribs are custom-cut and professionally folded in a double-lock configuration.

At the top copper flat seam panels will be tailored to fit the flat areas of the roof. Each panel will be pre-soldered at the edge, ensuring optimal flow of solder into the full panel seam. Not pre-soldering could lead to joints with minimal solder at the edge, resulting in premature failure. Panels will be secured with copper roof cleats and nails featuring oversized pre-punched holes to allow for the movement of the copper.

Copper counter flashing is attached to the brick wall. First, a groove, traditionally called a raggle, is cut into the mortar joint above the sandstone. The counter flashing is set into the groove and secured with lead wool. Compatible mortar is installed to finish and seal the flashing.

A new European-style copper gutter and downspout system is expertly installed around the perimeter of the newly constructed copper roof. The gutter features meticulously soldered seams at the corners and downspout outlet, ensuring durability and preventing leaks. Once the installation is complete, a thorough cleaning process is undertaken to remove any debris or dirt that may have accumulated. Soldering flux residue is removed and neutralized, and copper bits and pieces are removed from the surrounding landscape. With these final touches, both the roof and gutter are fully prepared to provide a lifetime of reliable service while enhancing the aesthetic appeal of the property.

We serve the following areas of Northeast Ohio and Greater Cleveland.
- Cleveland Heights
- Shaker Heights
- Rocky River
- Lakewood
- Bratenahl
- Pepper Pike
- Chagrin Falls,
- Moreland Hills
- Waite Hill
- Kirtland
- Beachwood
- Greater Cleveland
- Northeast Ohio
DM Crookshanks Copper and Slate Roofing
Please call : 440 285-3200
Please leave a message as I am usually up on a roof. I will get back to you soon.
Or email :
Please include name, address, phone number and a short description of the roof issue.
Thank you

Repair of a leaking copper roof panel on a Frank Lloyd Wright "Usonian" design house with Bermuda style roofing.
Copper Roof Repair
Damaged or leaking copper roofs can often be repaired, but whether to repair or replace will depend on several factors. These include the extent and severity of the damage, the location of the affected area, and the age of the roof. In cases of a leaking copper roof, the success of repairs largely depends on the original installation techniques, roof design, and the skill of the original installer.
Common causes of copper roof damage or leaks include falling tree branches during storms, loose roof slate or tiles sliding off from higher roofs, and even falling bricks from deteriorating chimneys. However, most leaks in copper roofs are typically due to installation errors.
Repairing a copper roof usually involves cleaning the existing roofing material and soldering new patches of comparable copper sheet over any holes or punctures. Alternatively, damaged roof panels can be replaced with new copper panels.
**Factors to Consider When Repairing or Replacing a Copper Roof**
1. **Age of the Copper Roof:**
As copper ages, it develops a layer of copper oxide known as copper patina. This patina begins as a thin coating with a dark bronze or olive hue and gradually thickens over time. Typically, it turns light green after about 15 to 20 years, depending on the local climate. The thickness of the patina varies based on the roof's design; areas with less exposure to erosion will have a thicker patina, while those with more exposure will have a thinner layer. For effective repairs, this patina must be removed mechanically to expose clean, bright copper of sufficient thickness before soldering a repair patch.
2. **Severity of Roof Damage:**
Small damaged areas can often be repaired quickly and efficiently. However, if a large portion of the roof is damaged, it's essential to evaluate whether it's financially sensible to repair it. In some cases, the cost of materials for repairing the existing copper may be higher than the labor costs associated with installing new copper roofing.
3. **Location of Damage:**
Damage located along standing seams and horizontal seams is particularly challenging to repair. The additional layers of folded or lapped metal make it difficult to open and clean the metal joints sufficiently for proper soldering or panel replacement.
4. **Roof Design:**
Sometimes, the roof area may be improperly pitched or too flat for a standing seam roof. Additionally, seams and panels may be installed incorrectly, such as seams running horizontally on a barrel-style roof.
**Examples of Repairable and Unrepairable Copper Roofing:**
Repairable copper roof.
Falling slate shingles damaged this 100-year-old copper flat seam roof. The copper has a thick layer of copper patina, which has protected the metal from wear and tear. With careful cleaning and preparation, a new copper metal patch can be soldered over the damaged areas for a permanent repair.
A poorly soldered leaking roof seam new enough to warrant repair.
Copper roof repair is in progress. The seam has been opened for cleaning the original copper patina to bare metal before fitting and soldering.

An example of an unrepairable copper standing seam roof.
An example of an unrepairable copper standing seam roof is one with an insufficient pitch or slope. This condition allows for snow and ice accumulation, which can lead to the formation of ice dams during winter. This can cause water to back up and enter the standing seams of the roofing. Furthermore, these roofing joints are caulked instead of properly folded together. The caulking can dry out and crack within a few years due to extreme heat and panel movement.
Original installation error.
Broken flat seam joint. Improper soldering technique led to this seam breaking and eventually causing a leak. All the seams on this roof were incorrectly soldered, and the entire roof was replaced.

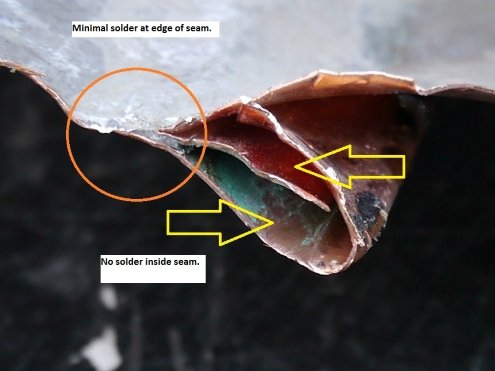
Typical causes of broken seams are incorrect soldering.
Most broken seams look like the image below. There is only a small amount of solder at the seam edge, and no solder is present between the folded layers of copper. These seams are easily broken. If the majority of the roof were soldered in this way, it would be better to replace the entire roof.
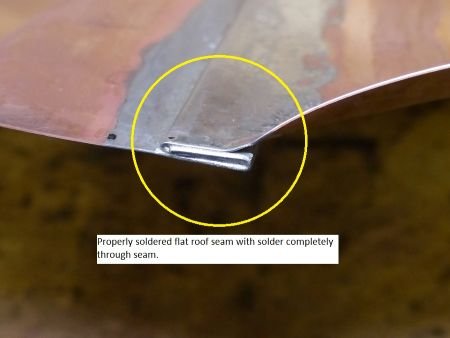
And a well-soldered copper roof seam. The solder has flowed through the entire seam for a permanent, unbreakable joint.
This copper roof was damaged by a storm and further compromised by both the original and subsequent installation errors.
The roof was installed poorly the first time. The standing seams are single-lapped instead of double-folded, and therefore, they are easily pulled apart under pressure.
The same type of damage has occurred before; heavy snow slides have torn a snow guard from the roof, and a poor repair was installed. A repair patch has been screwed through the roof in a terrible attempt at roof repair. That repair technician then re-installed the snow guard without addressing the cause of the original damage.

Worn-out copper roofing sheet.
This roof has worn through near the soldered seam. A good indication of worn-out, too-thin-to-solder roofing is the presence of an orange coloring on the copper. The protective copper patina has worn off due to excessive weathering, revealing the bare copper beneath.
