Repairing a copper bay window roof in Gates Mills, Ohio.


Our recent repair of a copper standing seam roof in Gates Mills, Ohio.
The copper roof covering the front bay window had been leaking for an extended period, and there had been multiple failed attempts to fix the leaks. We were called in when these attempts were unsuccessful. It became evident that the roof had likely leaked since its original installation.
The standing seam panels, vertical ribs, and panel connections were all carelessly installed, and the prior caulking repairs were inadequate. We were asked to repair the immediate leaking area on the left side of the roof, while leaving the rest untouched to save time and money.


Incorrect installation of roof panels and flashing.
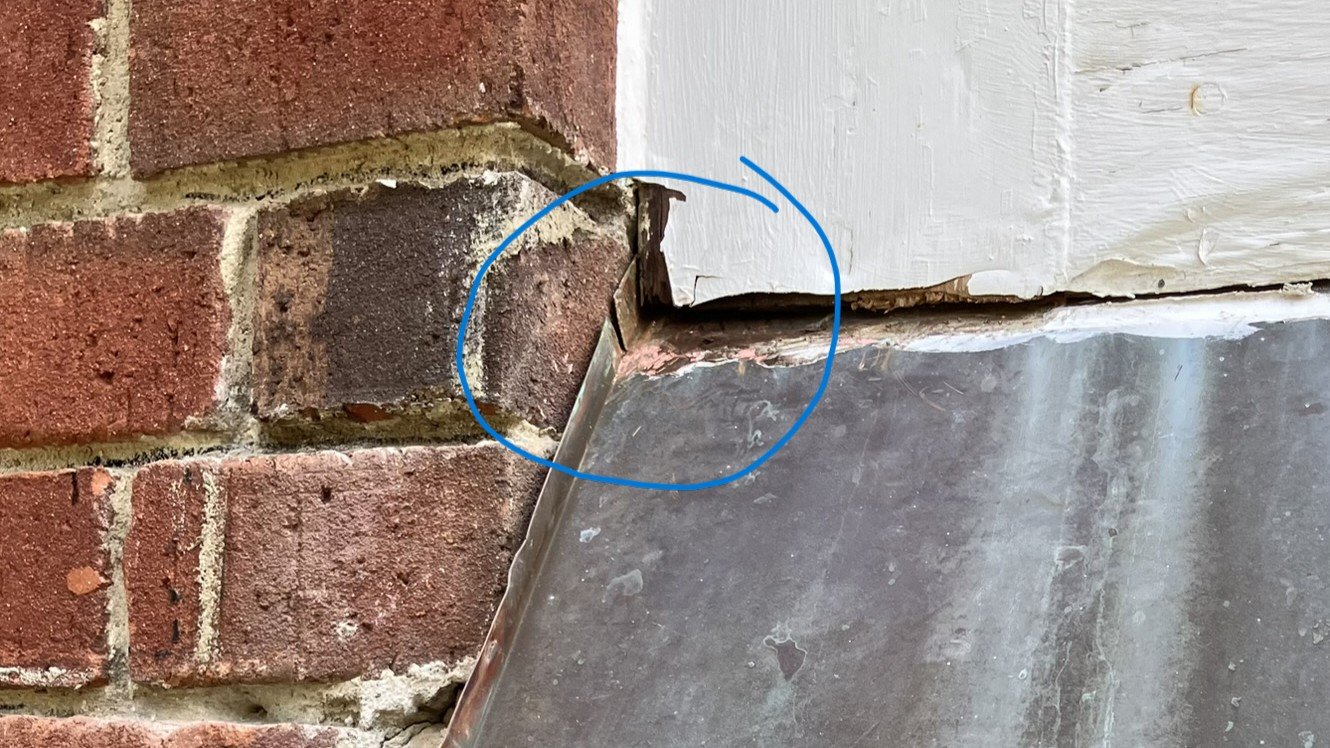
We started by removing two layers of caulking and the wall flashing. The wall flashing had been installed in two pieces of copper, cut to fit the brick courses. The copper was bent over the top of the bricks and secured with steel nails that had begun to rust. Additionally, a cheap acrylic caulk was improperly used as a sealant at the flashing and brick joint.
This method of installing wall flashing will quickly lead to buckling from the sun's heat, causing it to loosen from the caulking. We identified the primary leak at the top of the wall flashing, where it bent around the brick to meet the window. This piece was not cut correctly and was installed below the brick mortar joint.
Beneath this poorly installed flashing lay the main roof panel, which had been cut at the upstand to fit under the window trim—another source of leakage. Around the corner, the wall roof panel was similarly cut and bent against the wall and the lower rib piece. The cuts only had a small dab of caulking applied at the lower corner, which did little to prevent leaking.


Typical standing seam roof leak area
The standing seam panels were installed by bending the edges up three-quarters of an inch, then holding them in place with copper clips. At the intersection with the hip roof, the panel upstands were merely cut and butted together, leaving a large gap—as shown in the picture—where water could easily enter the roof.
The upstand bends were covered with a simple V-bend copper strip, which was secured using an inappropriate punching tool that cut through both the V-cover and the panel upstands.

New copper standing seam panel installed.
We removed all the existing wall flashing and roof panel, then installed new high-temperature underlayment. New gutter board flashing and custom drip edging, extending behind the gutter, were also installed to prevent ice backup into the roof eave. Given the design of this area—the roof being so close to the second-story wall with a gutter and downspout between them—this location is particularly vulnerable to snow buildup and ice damming.

New roof panel and flashing.
A new roof panel was fabricated, along with additional flashing to close the old standing seam hip ridge. These pieces were fitted to cover and protect the existing seams and secured with copper cleats. A groove was cut into the mortar joints of the wall to receive the wall flashing. Individual counter flashing pieces were cut and fitted to the wall, secured with lead and copper nails. A compatible mortar was then mixed, pressed firmly into the joints, and tooled to match the existing masonry.
